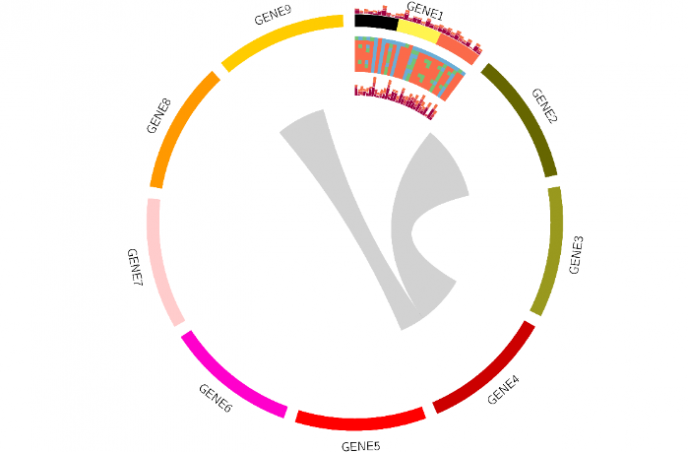
上一篇 circos绘图-从入门到精通(一) 我们讲到了circos一些基本元素的使用,如何绘制一个circos图以及如何添加关系线等。本篇主要介绍如何在上一篇的基础上添加热图和柱状图。主要用到<plot></plot>块,下面通过实例给大家简单讲解其用法。
首先我们需要热图数据文件heatmap.txt(注:此处我们用GENE1来做演示,其中热图绘制本文为了简单起见直接复制了几次,这个未来是有一些宏命令来绘制,感兴趣的朋友建议对照官方教程学习),格式及内容如下:
名称 起始位置 结束位置 值 id
hs1 0 1 147 id=hs1
hs1 1 2 736 id=hs1
hs1 2 3 92 id=hs1
hs1 3 4 823 id=hs1
hs1 4 5 141 id=hs1
hs1 5 6 994 id=hs1
hs1 6 7 54 id=hs1
hs1 7 8 985 id=hs1
hs1 8 9 496 id=hs1
hs1 9 10 910 id=hs1
hs1 10 11 489 id=hs1
hs1 11 12 976 id=hs1
hs1 12 13 497 id=hs1
hs1 13 14 109 id=hs1
hs1 14 15 47 id=hs1
hs1 15 16 947 id=hs1
hs1 16 17 906 id=hs1
hs1 17 18 318 id=hs1
hs1 18 19 272 id=hs1
hs1 19 20 787 id=hs1
hs1 20 21 818 id=hs1
hs1 21 22 456 id=hs1
hs1 22 23 581 id=hs1
hs1 23 24 736 id=hs1
hs1 24 25 917 id=hs1
hs1 25 26 548 id=hs1
hs1 26 27 753 id=hs1
hs1 27 28 946 id=hs1
hs1 28 29 105 id=hs1
hs1 29 30 288 id=hs1
柱状图文件histogram.txt,格式及内容如下:
名称 起始位置 结束位置 值(多个值逗号分割)
hs1 0 1 64,16,14
hs1 1 2 14,21,20
hs1 2 3 5,31,46
hs1 3 4 38,1,22
hs1 4 5 26,9,36
hs1 5 6 66,11,8
hs1 6 7 84,39,48
hs1 7 8 24,40,4
hs1 8 9 13,9,24
hs1 9 10 22,18,37
hs1 10 11 38,10,44
hs1 11 12 98,29,43
hs1 12 13 28,26,5
hs1 13 14 79,2,19
hs1 14 15 75,2,23
hs1 15 16 14,13,33
hs1 16 17 88,25,26
hs1 17 18 48,26,4
hs1 18 19 14,36,35
hs1 19 20 54,30,35
hs1 20 21 69,26,7
hs1 21 22 58,37,36
hs1 22 23 31,23,38
hs1 23 24 74,42,40
hs1 24 25 15,43,47
hs1 25 26 31,15,24
hs1 26 27 73,11,44
hs1 27 28 4,23,3
hs1 28 29 93,9,42
hs1 29 30 28,33,36
配置文件:
# circos.conf
# karyotype定义染色体的名字、ID、起始位置信息
# 格式:chr - ID LABEL START END COLOR
# 解释:空格分割,前两列格式固定以chr开始
karyotype = data.txt

# links块以曲线连接显示基因组内部之间的联系
<links>
<link>
# 定义关联信息文件
file          = link.txt
show          = yes
ribbon        = yes
flat          = yes
radius        = 0.6r
bezier_radius = 0r
color         = black_a5

</link>
</links>

# 将染色体在圈图上展示出来,代表每个染色体的图形
<ideogram>

# 是否显示每个染色体带宽
show_bands = yes
fill_bands = yes

# 是否显示每个染色体标签、字体等信息
show_label       = yes
label_font       = default
label_radius     = 1r + 75p
label_size       = 60
label_parallel   = yes

<spacing>
#  定义染色体之间的间距,为图形半径的5%
default = 0.01r
</spacing>

# 染色体区域的绘制位置,设置图形半径的0.9倍的位置
radius    = 0.9r
# 染色体区域的宽度,可以是相对图形半径(r),也可以说绝对像素值(p)
thickness = 80p
# 染色体区域填充颜色
fill      = yes

</ideogram>

# 绘制热图,此处方便演示,我们绘制了9个组合
<plots>
# 热图
<plot>
type  = heatmap
file  = heatmap.txt
r1    = 0.95r
r0    = 0.93r
# 指定颜色
# 可以指定颜色名称
# 也可指定一个颜色列表,如:color = spectral-11-div
color = red,green,blue
scale_log_base = 0.25
</plot>
<plot>
type  = heatmap
file  = heatmap.txt
r1    = 0.93r
r0    = 0.91r
color = red,green,blue
scale_log_base = 10
</plot>
<plot>
type  = heatmap
file  = heatmap.txt
r1    = 0.91r
r0    = 0.89r
color = red,green,blue
scale_log_base = 2
</plot>
<plot>
type  = heatmap
file  = heatmap.txt
r1    = 0.89r
r0    = 0.87r
color = red,green,blue
scale_log_base = 5
</plot>
<plot>
type  = heatmap
file  = heatmap.txt
r1    = 0.87r
r0    = 0.85r
color = red,green,blue
scale_log_base = 6
</plot>
<plot>
type  = heatmap
file  = heatmap.txt
r1    = 0.85r
r0    = 0.83r
color = red,green,blue
scale_log_base = 10
</plot>
<plot>
type  = heatmap
file  = heatmap.txt
r1    = 0.83r
r0    = 0.81r
color = red,green,blue
scale_log_base = 2
</plot>
<plot>
type  = heatmap
file  = heatmap.txt
r1    = 0.81r
r0    = 0.79r
color = red,green,blue
scale_log_base = 5
</plot>
<plot>
type  = heatmap
file  = heatmap.txt
r1    = 0.79r
r0    = 0.77r
color = red,green,blue
scale_log_base = 6
</plot>
#########################柱状图#########################
# 内圈柱状图
<plot>
type = histogram
file = histogram.txt
r1   = 0.75r
r0   = 0.65r

color      = white
# 设置填充色
fill_color = spectral-11-div

thickness  = 2

sort_bin_values = no
extend_bin      = no

<axes>
<axis>
color     = white
thickness = 2
spacing   = 0.01r
</axis>
</axes>
</plot>

# 外圈柱状图
<plot>
type = histogram
file = histogram.txt
# 柱状图位置
r1   = 1r + 70p
r0   = 1r + 5p

color      = white
# 设置填充色
fill_color = spectral-11-div

thickness  = 2

sort_bin_values = no
extend_bin      = no

<axes>
<axis>
color     = white
thickness = 2
spacing   = 0.01r
</axis>
</axes>
</plot>

</plots>

# 默认引用的文件
<image>
<<include etc/image.conf>>
</image>
<<include etc/colors_fonts_patterns.conf>>
<<include etc/housekeeping.conf>>
data_out_of_range* = trim
配置好数据和配置文件后执行circos -conf circos.conf即可 。
参考资料:
1.http://circos.ca/documentation/tutorials/
